Looker Studio CASE WHEN – Statement Guide

Ever wanted to reorganize your data in Looker Studio (previously Google Data Studio) with just a few simple lines? The CASE statement is exactly what you need. In this guide, we’ll break down how and why to use CASE, especially in an eCommerce setting. By the end, you’ll see how to group dimensional data in meaningful ways—without overcomplicating things.

What Is a CASE Statement?
A CASE statement is like telling a story with conditions. For each row in your data, you ask a question (“Is this row Product A?”) and then decide what label you want to give it (“If yes, call it ‘Shoes’; if no, call it something else.”). You’re effectively re-grouping or re-labeling dimension values to create something more useful.
Think of your data as a big table. Each row is an event—like an order placed or a product viewed. CASE lets you group and classify these rows based on the dimension values they carry. This helps you see patterns in your eCommerce business without manually changing each record.

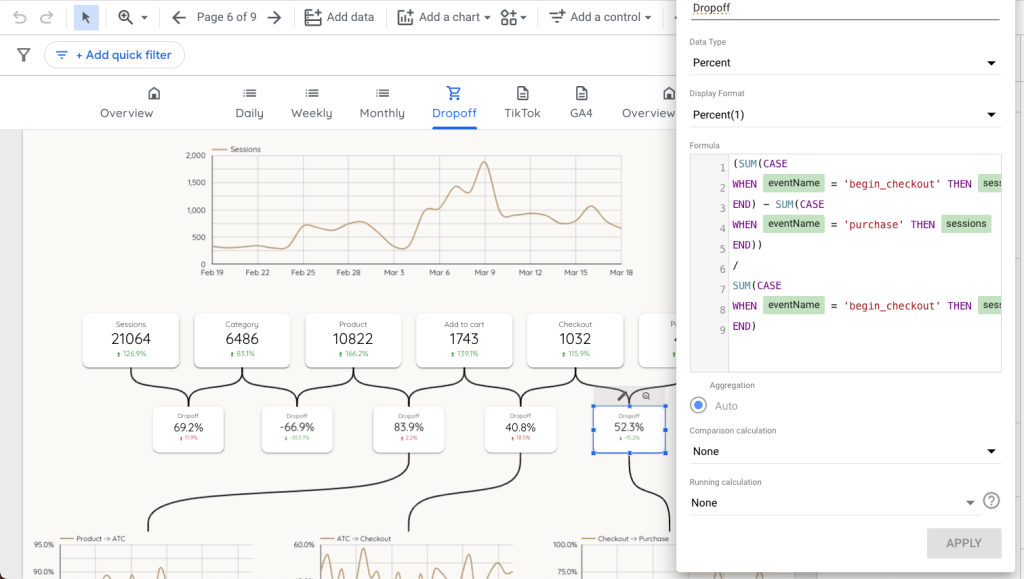
Notice how the fields are marked green? This tells us that the field we are using is not pre-aggregated, which is a must for a CASE statement to actually work without throwing an error.
Why CASE Statements Only Work With Dimensions
One crucial point about Looker Studio: CASE statements only work with dimensions, not metrics. Why?
Dimensions are categories—like product names or shipping countries—while metrics are the numbers that get aggregated, such as total sales, number of sessions, or quantity sold. When you try to apply a CASE statement to a metric, Looker Studio has difficulty grouping data that’s already being summed or counted. CASE is about classification, not direct math on totals.
The Power of Aggregation
When you see a metric (like total sales), remember it’s an aggregate of all the rows in your underlying data table. A metric by itself doesn’t carry row-level labels you can “if-else” against. Instead, your dimension is what organizes those rows into buckets.
In eCommerce, CASE statements can help you do things like:
- Group specific product categories into a single label (e.g., “Footwear” for all shoe types).
- Create custom channel groupings (e.g., group “Facebook Ads” and “Instagram Ads” as “Social Ads”).
- Simplify or rename certain dimension values (e.g., “USA” and “United States” both become “US”).

Thinking in Tables: How CASE Affects Your Data
Picture your raw data as a spreadsheet with hundreds of rows. Each row might show:
- Order ID
- Product Category
- Transaction Channel
- Revenue
When you create a CASE statement, you’re telling Looker Studio how to label each row’s dimension value. For instance:
CASE
  WHEN Product_Category = "Shoes" THEN "Footwear"
  WHEN Product_Category = "Boots" THEN "Footwear"
  ELSE "Other Category"
END
After you apply this, all “Shoes” and “Boots” rows get the label “Footwear.” Now, when you look at the metrics—like total revenue—for “Footwear,” it aggregates the revenue from both Shoes and Boots rows. The label changes, but the metric is summed up automatically across that new label.
Common Use Cases for E-Commerce Owners
As an eCommerce manager, you might use CASE statements to:
- Combine low-volume products into a single group so you can see how they perform as a whole.
- Re-group marketing channels to match your internal naming conventions.
- Clean up messy data (e.g., multiple spellings or synonyms for the same product line).
All of these are dimension-based tasks. Once your dimension is nicely grouped, your metrics—like revenue or items sold—will be aggregated under these new dimension groups.
Step-by-Step: Creating a CASE Field in Looker Studio
- Open your Looker Studio report and click on “Edit”.
- In the Data panel, choose Add a Field.
- Enter your CASE statement into the formula box.
- Click Apply, then Save to confirm.
Now you can use your new dimension in charts or tables like any other dimension. Just remember: metrics get summed or averaged, while dimensions are grouped. A CASE statement is for grouping! ( Or filtering if your data source is advanced or a Google BigQuery connection ).
Final Thoughts
The Looker Studio CASE statement is a powerful tool that lets you simplify and restructure how you view your eCommerce data. By focusing on dimensions, you can create custom groupings, rename categories, and keep your metric calculations intact. Whenever you want to build a new perspective of your store’s performance, think about the underlying data table and use CASE statements to let Looker Studio do the heavy lifting.
Happy reporting!

